Posts

Showing posts from 2018

Solar Light Upgrade

Image
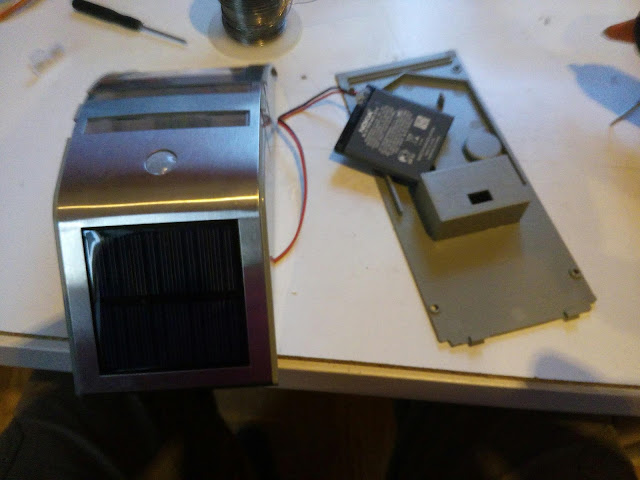
I bought one of these solar security lights from Home Bargains and it failed after one night so I took it back for a replacement and the new one did the same thing. Bad batch I thought, so I had to take a look inside. Turned out the lithium-ion battery was duff and holding no charge. It was an AA-sized 3.7 volt battery with no marked capacity so a hunt in the parts bins was called for and this root around turned up a new Nokia 'phone battery in the same 3.7 voltage and 950mAh capacity. A bit of soldering and hot glue wizardry and the light is working as it should.

LED Backlight Repair

Image
A kind lady on Freegle gave me a load of broken electronic items including a 39-inch  ISIS brand LCD television. It turned out this was another Vestel rebranded chassis. I rigged it up to a DVD player and used the bright torch trick to check that there was an active picture, but no backlight. There was about 120 volts being delivered to the backlight and a bit of research online suggested at least 1 of the LEDs might have gone open-circuit. I dismantled the entire set as carefully as possible and found 5 strips of 9 LEDs, all 45 wired in series. This requires a voltage of about 135 volts, but means the current can be kept low and constant. With the strips separated I was able to apply about 25 volts to each strip. 2 strips were fine, 2 were illuminating, but had a dead LED each (LEDs had shorted out) and the last was completely dead meaning an open-circuit LED. On the bench I was able to identify the open-circuit LED. I had some salvaged LED strips from a television that had suffered a

PCB Holder

Image
I treated myself to a decent PCB holder for soldering, something I should have bought years ago. This is especially useful now that I have a hot air soldering station for working on surface mount and other small components. I still need practice with the hot air gun, but it's fun learning and the repairs are always interesting (see posts on the Samsung Galaxy Tab E tablet repair ).

Cheap Upcycled Number Plate

Image
I needed a rear number plate to hang on the bicycle carrier or to fix to the back of a borrowed trailer. The stick-on number plate was £6 on eBay ready made up, but I needed a lightweight plastic something to stick it to. A lightweight plastic something which had been dumped in the forest a couple of miles above where we live after a failed oil-drilling exploration (yes, in Ireland, I kid thee not!) and it was exactly the right colour for a UK rear number plate. The 2 thin pieces glued at each side are to give the plate a bit of rigidity. A sweet upcycle. I'll put a couple of small holes at the top corners to feed cable ties or twists through.

Successful TV repair

Image
This Sharp 22-inch widescreen was as dead as Dillinger, but that's not a bad thing as it usually means the power supply has gone which is easier to fix than a backlight inverter. After checking the obvious things that might be a problem including the fuses and the ON/OFF switch I took the power board out. A quick search online revealed (as usual) a common failing, not bad capacitors in this case, but a failed diode. There were 3 large, high current (5A) diodes on the board wired in parallel and after unsoldering one leg of each diode from the board I was able to test each one and right enough the middle one was shorted out. A lot of searching of old boards yielded up a 4A diode at a slightly higher voltage rating which I figured would do as a replacement to test the television, so I soldered the 2 good ones back in place and replaced the bad one. With everything back together the set works a treat, especially with the Freeview HD box on the right which can power an amplified a

Bad, bad caps.

Image
I was given a broken Acer monitor recently which was powering up but not displaying anything. I took it apart and was surprised to find this, but not where I expected it. The capacitors in the main power supply were fine and the supply was giving out the correct voltages, but for some reason Acer (or whoever made the power board) had decided to use a different manufacturer's capacitors for the part of the circuit powering the backlight inverter and 3 of these had blown. You can clearly see the top of the capacitor has been pushed up and evidence of leaking electrolyte in the 'hot-cross bun'. This looked like an ideal candidate to test my new capacitance meter I got on Amazon and received (from China of course) only last week. The capacitor is marked as 1000uF, so let's see what it is actually doing now. Oh dear, only 230uF and probably on it's way to a dead short. Unfortunately one of the other ones looked like it had exploded and had shorted

Bletchley and Bitcoins

Image
Just watched 'The Imitation Game' on Film4, the excellent drama about Alan Turing. By coincidence I dismantled this oddity today. It's a Butterfly Labs Bitcoin miner, now obsolete, but capable of processing 60 million SHA hashes per second (you read that right). Apparently today you need about 800 million per second as Bitcoin mining becomes increasingly difficult. The Bletchley Park 'Bombe' computers did basically the same job as this thing only many orders of magnitude slower. This thing isn't a computer, but a dual ASIC, Application Specific Integrated Circuit. It had 4 fans (count 'em) to keep it cool and drew about 1Kw of power. At best you could mine a couple of hundred Bitcoins a week back in 2013 when this became available. Butterfly Labs have since been forcibly closed down by the US courts.

Ruxpin Arduino Upgrade

Video Teddy Ruxpin hacked! He has a motor and potentiometer in his head which were wired to a servo control on his main board. After a bit of trial and error I was able to get the electronics from an old servo connected up so that he can be controlled directly by the Arduino (in this case a Nano) using the servo library. I'll have him talking soon!

Electric Vehicle Charger Installation

Image
Okay green energy fans and cheapskates who love getting something cheap, here is my quick guide to getting a home electric vehicle (EV) charging point installed. First of all you are entitled to a grant of up to £500 against the installation from the Office for Low Energy Vehicles (OLEV), which your installer will process for you. After some research we went for the EO 32-amp charger installed by Baird Electrical and this cost us £250 after the grant was applied. The installation was very straightforward as the charging point is beside the meter box on the outside of our house which itself is on the driveway. The EO charger is the simplest to operate and all that was required in the meter box was a 40-amp RCBO in a separate consumer unit.  After getting the charging point installed we decided to switch to a Day/Night meter to get half-price electricity at night to charge the car. Our supplier is Airtricity and the night rate in the summer runs from 12:00am until 9:00am whi

Television LED Light Box

Image
Another broken television, this time a slimline 32-inch Bush which had suffered a cracked LCD during a house move. So I took off the LCD panel and dumped that and behind we have 22 high-output LEDs as a backlight. These are 3-volts each and wired in series so that the current can be kept constant and relatively low, which means the power supply has a 66-volt feed out to the backlight. Luckily the power supply is working fine so it was easy to rig a test (always being careful not to electrocute oneself, kids) and even control the light using the power button on the old remote. It is very bright and looks amazing. The only downside is where to put the power supply so that it is out of harm's way and earthed because the remnant case is metal. Unfortunately it is just too wide to sit in between the 2 rows of LEDs inside the box, but I'll work on it.

Light Strike Bonus Ninja Find

Image
We've been collecting the last remnants of the Wow-Wee Light Strike series over the last few years because for home laser tag these are great fun. http://rgwni.blogspot.co.uk/2015/03/i-bought-couple-of-these-light-strike.html Unfortunately, the prices on eBay have got completely out of hand and there are very few items left in the UK, so finding this working pistol in the Barnardo's charity shop in Carrickfergus for £1.99 was a stroke of luck. It means we can have a side arm each to go with our pulse rifles when we're playing Starship Troopers!

In the beginning there was the Word...

Image
In a fit of nostalgia I ordered up 'Making A Transistor Radio' from a second-hand book seller on eBay a couple of weeks ago. This wasn't entirely necessary as the book has been scanned, PDF'd and uploaded several times over the last few years, but I wanted, no, I needed a copy. Why? Because this is where it all began, my obsession with technology and anything that needs electricity to run. As some of you are aware my grandfather Bertie Walsh was one of the first radio amateurs in Ireland and had his original licence under Marconi's patents. His callsign was GI4RY and if you Google that you can still find a couple of references and I think a scan of one of his QSL cards. He made his fortune as a cinema magnate in the 1930s and was fascinated by the technology of the time. So I grew up with this wonder for anything connected to radio or television and my earliest memory (aged 3) was the adults (mainly drunk) going mental in July 1969 when a certain man stepped

Samsung Power Supply

I've been fiddling about with a 40" Samsung LCD television today. I was given this free because the power board had packed in. The previous owner had attempted a repair by replacing the 'Bad Caps' (i.e. blown electrolytic capacitors, Google that one!), but the de-soldering and soldering was a bit ropey looking so I tidied that up and replaced 2 of the capacitors myself as one didn't look right and the other was the wrong value. I managed to find a schematic diagram online for the board (Hansol SIP400B), which was helpful in identifying the capacitor values. Anyway, I put it back in the TV and powered it up and all the voltages coming off the board are correct, but all it does is click. This is the result of a relay on the board switching the circuit from  standby to power on. The red LED on the front panel lights and the set is receiving IR signals from the remote control. This is really frustrating, but as 95% of these boards suffer from Bad Caps, I might just

Retro Keypad Find

Image
I was having a clear out and found this homemade keypad. I built this as part of my computing project when I was training to be a teacher in 1989. I used to go up to the Maplin store in Edgeware on the tube to get parts, or Cricklewood Electronics which was like the Old Curiosity Shop. This wasn't cheap either, I had to buy about 20 of the switches with separate caps, but it looked good when it was done with the Letraset transfer letters. The keypad was wired to a Sinclair Spectrum to allow entry of Logo-ish commands to a Lego Technic robot buggy. Happy days!